本文记录搭建此 Blog 的具体步骤和一些 tips
# 一/ 介绍
其实一直都有搭建个人博客的想法,但是没实施,原因很简单:大部分后端的技术栈还没有学习过,前端又有一堆文档等着啃。
偶然间在 B 站看到有些大佬在评论区贴上自己的 Blog,其中介绍到VuePress,在了解其搭建过程后,意识到还是可以搞一搞的,遂搞。
# 二/ VuePress
此博客使用VuePress (opens new window) + vuepress-theme-reco (opens new window)主题构建。
VuePress由两部分组成:第一部分是一个极简静态网站生成器 (opens new window),它包含由 Vue 驱动的主题系统和插件 API,另一个部分是为书写技术文档而优化的默认主题,它的诞生初衷是为了支持 Vue 及其子项目的文档需求。事实上,一个 VuePress 网站是一个由 Vue (opens new window)、Vue Router (opens new window)和 webpack (opens new window)驱动的单页应用。
vuepress-theme-reco:一位大佬开源的 VuePress 主题,根据默认主题修改而成,且官方的主题配置仍然适用。
# 三/ 步骤
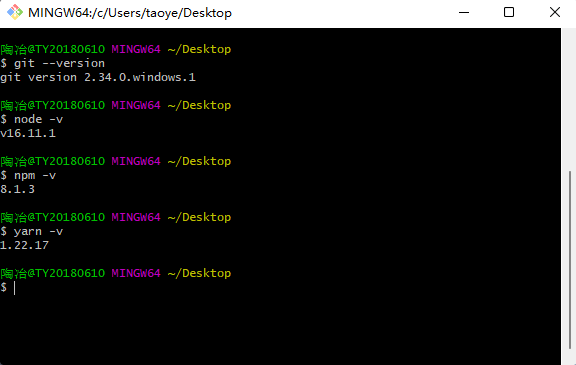
# 1. 准备环境

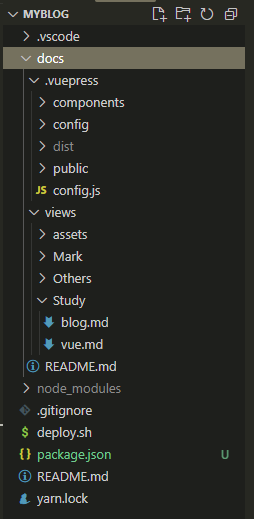
# 2. 创建目录

其中:
docs:根目录
.vuepress:此文件夹名称固定,不得更改
components:vue 组件
config:一些配置项
config.js:必要配置文件
public:静态文件
views:展示页面
README.md:主页
包初始化&安装 VuePress 本地依赖&安装 vuepress-theme-reco
VuePress 官方推荐使用 Yarn 安装
yarn init # npm init
yarn add -D vuepress # npm install -D vuepress
yarn add vuepress-theme-reco # npm install vuepress-theme-reco --save-dev
2
3
# 3. 主页和配置项
README.md 主页,需要注意一个地方:图片的指向是默认在 public 下的。
---
home: true
heroImage: /img/naruto3.png
heroText: This is Tao
tagline: 世上没有白走的路,每一步都算数
bgImage: '/img/bg.png'
bgImageStyle: { height: '100vh', color: '#fff' }
---

<NewFont />
2
3
4
5
6
7
8
9
10
在 config.js 中引入 vuepress-theme-reco 主题,并设置为 blog 模式
// .vuepress/config.js
module.exports = {
  theme: 'reco',
  themeConfig: {
    type: 'blog'
  }
}
2
3
4
5
6
7
在 package.json 中配置服务器启动
//package.json
{
  "scripts": {
    "docs:dev": "vuepress dev docs",
    "docs:build": "vuepress build docs"
  }
}
2
3
4
5
6
7
yarn docs:dev # npm run docs:dev
此时若配置无误,应该可以在 http://localhost:8080 看到主页,这样一个博客的雏形就建立好啦。
接下来就是一步一步补充完善你需要有的细节,其实接下来的步骤让我联想到以前装扮 QQ 空间的时候,都是往上添加自己喜欢的个性化组件,不过这里是用代码而已。
OK,那么接下来先从导航栏开始吧。
左侧的 logo 和博客名:
// .vuepress/config.js
module.exports = {
  title: "Tao's blog",
  themeConfig: {
    logo: '/img/naruto.jpg' //nav左侧的小logo
  }
}
2
3
4
5
6
7
右侧,其中夜间模式切换和搜索栏为主题自带:
// .vuepress/config.js
module.exports = {
  themeConfig: {
    nav: [
      { text: '主页', link: '/', icon: 'reco-home' },
      {
        text: '时间线',
        link: '/timeline/',
        icon: 'reco-date'
      },
      {
        text: '留言板',
        link: '/views/Others/messageBoard.md',
        icon: 'reco-message'
      },
      {
        text: '关于',
        link: 'https://vuepress-theme-reco.recoluan.com/',
        icon: 'reco-blog'
      }
    ],
    blogConfig: {
      category: {
        location: 2, // 在导航栏菜单中所占的位置,默认2
        text: '分类' // 默认文案 “分类”
      },
      tag: {
        location: 3, // 在导航栏菜单中所占的位置,默认3
        text: '标签' // 默认文案 “标签”
      }
    }
  }
}
2
3
4
5
6
7
8
9
10
11
12
13
14
15
16
17
18
19
20
21
22
23
24
25
26
27
28
29
30
31
32
33
导航栏中的分类、标签以及时间线,需要在文章页面中进行设置:
---
title: VuePress搭建个人Blog
date: 2021-11-27 12:40
categories:
  - blog搭建
  - 历程
tags:
  - Blog
  - VuePress
sticky: 1
---
2
3
4
5
6
7
8
9
10
11
这里需要注意符号为全英文,若使用中文符号可能会导致一些显示不全的问题。
文章中不能出现直接标签,需要用某种方式括起来,否则可能导致文章详情页面不显示文字,比如<a>,如果不用“``”把它装起来,这篇文章就一个字看不见了。
留言板和文章评论功能会放在另一篇文章中说明。
主页的具体配置项在 reco 的 官方文档 (opens new window)中有详细说明。
下面是一些个人觉得比较有用的 Plugins:
其中的音乐播放器插件可以直接拉取网易云音乐的歌单,属实不错,mid可以通过分享歌单的链接得到。
module.exports = {
  plugins: {
    // 阅读进度条: "vuepress-plugin-reading-progress"
    'reading-progress': true,
    //一键复制代码插件: "vuepress-plugin-code-copy"
    'vuepress-plugin-code-copy': true,
    // vuepress-plugin-dynamic-title
    'dynamic-title': {
      showIcon: '/favicon.ico',
      showText: '',
      hideIcon: '/failure.ico',
      hideText: '嘿!咋走啦',
      recoverTime: 2000
    },
    //vuepress-plugin-meting: 音乐播放器
    meting: {
      meting: {
        // 网易
        server: 'netease',
        // 读取歌单列表
        type: 'playlist',
        mid: 'yourmid'
      },
      // 不配置该项的话不会出现全局播放器
      aplayer: {
        fixed: true,
        mini: true,
        autoplay: true,
        listFolded: true,
        theme: '#f9bcdd',
        order: 'random',
        volume: 0.3,
        lrcType: 0
      },
      mobile: {
        // 手机端去掉cover图
        cover: false
      }
    }
  }
}
2
3
4
5
6
7
8
9
10
11
12
13
14
15
16
17
18
19
20
21
22
23
24
25
26
27
28
29
30
31
32
33
34
35
36
37
38
39
40
41
其实到这里一个博客的功能就基本具备了,如果深挖还是有很多可以去玩的地方的。
当然,建立博客的目的可不能忘了,一定要输入内容才有它存在的意义。
# 4. 上传 Github 并部署
这里有一些要注意的点和踩过的坑,记录在这里。
