本文记录Vue框架基础学习笔记
# 1. Vue介绍
MVVM

- Model:负责数据存储
- View:负责页面展示
- View Model:负责业务逻辑处理(比如Ajax请求等),对数据进行加工后交给视图展示
Vue框架的特点
- 模板渲染:基于 html 的模板语法,学习成本低。
- 响应式的更新机制:数据改变之后,视图会自动刷新。【重要】
- 渐进式框架
- 组件化/模块化
- 轻量:开启 gzip压缩后,可以达到 20kb 大小。(React 达到 35kb,AngularJS 达到60kb)。
利用 vue-cli 新建项目
Vue 提供一个官方命令行工具,可用于快速搭建大型单页应用。
  vue create demo
  cd demo
  npm run serve
1
2
3
2
3

- build:打包配置的文件夹
- config:webpack对应的配置
- src:开发项目的源码
- App.vue:入口组件,
.vue文件都是组件。 - main.js:项目入口文件。
- App.vue:入口组件,
- static:存放静态资源
.babelrc:解析ES6的配置文件.editorcofnig:编辑器的配置.postcssrc.js:html添加前缀的配置index.html:单页面的入口。通过 webpack打包后,会把 src 源码进行编译,插入到这个 html 里面来。package.json:项目的基础配置,包含版本号、脚本命令、项目依赖库、开发依赖库、引擎等。
# 2. Vue的系统指令
插值表达式 {{}}
{{ number + 1 }}

{{ ok ? 'YES' : 'NO' }}

{{ name == '张三' ? 'true' : 'false' }}

{{ message.split('').reverse().join('') }}
1
2
3
4
5
6
7v-text
- 区别1:v-text 没有闪烁的问题,因为它是放在属性里的。
- 区别2:插值表达式只会替换自己的这个占位符,并不会把整个元素的内容清空。v-text 会覆盖元素中原本的内容。
v-html
v-bind:属性绑定
- 简写:”:“
v-on:事件绑定
- 简写:”@“
.stop阻止冒泡。本质是调用 event.stopPropagation()。.prevent阻止默认事件(默认行为)。本质是调用 event.preventDefault()。.capture添加事件监听器时,使用捕获的方式(也就是说,事件采用捕获的方式,而不是采用冒泡的方式)。.self只有当事件在该元素本身(比如不是子元素)触发时,才会触发回调。.once事件只触发一次。
举例:文字滚动显示(跑马灯效果)
<!DOCTYPE html>
<html>
<head>
<meta charset="utf-8">
<title>文档标题</title>
</head>
<body>
<div id="app">
  <p>{{ name }}</p>
  <p>{{ info }}</p>
  <button @click='handleToRun'>开始</button>
  <button @click='handleToStop'>结束</button>
  </div>
  <script src="https://cdn.jsdelivr.net/npm/vue@2.6.10/dist/vue.js"></script>
  <script>
  let vm= new Vue({
  el:'#app',
  data(){
    return {
      name:'这是一条会滚动的字幕',
      info:'stop'
    }
  },
  methods:{
    handleToRun(){
      if(this.info!='run'){
        this.textScroll=setInterval(()=>{
        let start=this.name.slice(0,1)
        let end=this.name.slice(1)
        this.name=end+start
      },800)}
      this.info='run'
    },
    handleToStop(){
      clearInterval(this.textScroll)
      this.info='stop'
    }
  }
})
   </script>
</body>
</html>
1
2
3
4
5
6
7
8
9
10
11
12
13
14
15
16
17
18
19
20
21
22
23
24
25
26
27
28
29
30
31
32
33
34
35
36
37
38
39
40
41
42
2
3
4
5
6
7
8
9
10
11
12
13
14
15
16
17
18
19
20
21
22
23
24
25
26
27
28
29
30
31
32
33
34
35
36
37
38
39
40
41
42
# 3. 列表功能
<!DOCTYPE html>
<html lang="en">
    <head>
        <meta charset="UTF-8" />
        <meta name="viewport" content="width=device-width, initial-scale=1.0" />
        <meta http-equiv="X-UA-Compatible" content="ie=edge" />
        <title>Document</title>
        <style>
            .table {
                width: 800px;
                margin: 20px auto;
                border-collapse: collapse; /*这一行,不能少:表格的两边框合并为一条*/
            }

            .table th {
                background: #0094ff;
                color: white;
                font-size: 16px;
                border: 1px solid black;
                padding: 5px;
            }

            .table tr td {
                text-align: center;
                font-size: 16px;
                padding: 5px;
                border: 1px solid black;
            }

            .form {
                width: 800px;
                margin: 20px auto;
            }

            .form button {
                margin-left: 10px;
            }
        </style>

        <script src="https://cdn.jsdelivr.net/npm/vue@2.6.10/dist/vue.js"></script>
    </head>

    <body>
        <div id="app">
            <div class="form">
                编号:
                <input type="text" v-model="formData.id" /> 名称:
                <input type="text" v-model="formData.name" />
                <button @click="addData">添加</button>
                搜索:
                <input type="text" v-model="keywords" />
            </div>
            <table class="table">
                <th>编号</th>
                <th>名称</th>
                <th>创建时间</th>
                <th>操作</th>
                <tr v-show="list.length == 0">
                    <td colspan="4">列表无数据</td>
                </tr>
                <!-- 因为要渲染搜索结果,所以直接获取方法返回的对象,也可以在键入值的时候调用事件 -->
                <tr v-for="(item,index) in search(keywords)">
                    <td>{{item.id}}</td>
                    <td>{{item.name}}</td>
                    <td>{{item.ctime}}</td>
                    <td>
                        <a href="#" @click="delData(index)">删除</a>
                    </td>
                </tr>
            </table>
        </div>
    </body>

    <script>
        var vm = new Vue({
            el: '#app',
            data() {
                return {
                    list: [
                        { id: 1, name: '奔驰', ctime: new Date() },
                        { id: 2, name: '宝马', ctime: new Date() }
                    ],
                    keywords: '',
                    formData: { id: '', name: '' }
                }
            },
            methods: {
              // 返回给列表循环
                search(keywords) {
                    let newList = this.list.filter((item) => {
                        if (item.name.includes(keywords)) return item
                    })
                    return newList
                },
                addData() {
                    if (this.formData.id && this.formData.name) {
                        this.formData.ctime = new Date()
                        // 浅拷贝
                        let obj = Object.assign({}, this.formData)
                        this.list.push(obj)
                    } else {
                        alert('输入为空')
                    }
                    this.formData.name = ''
                    this.formData.id = ''
                },
                delData(index) {
                    if (!confirm('是否要删除数据?')) {
                        //当用户点击的取消按钮的时候,应该阻断这个方法中的后面代码的继续执行
                        return
                    }
                    this.list.splice(index, 1)
                }
            }
        })
    </script>
</html>
1
2
3
4
5
6
7
8
9
10
11
12
13
14
15
16
17
18
19
20
21
22
23
24
25
26
27
28
29
30
31
32
33
34
35
36
37
38
39
40
41
42
43
44
45
46
47
48
49
50
51
52
53
54
55
56
57
58
59
60
61
62
63
64
65
66
67
68
69
70
71
72
73
74
75
76
77
78
79
80
81
82
83
84
85
86
87
88
89
90
91
92
93
94
95
96
97
98
99
100
101
102
103
104
105
106
107
108
109
110
111
112
113
114
115
116
117
# 4. 自定义指令
私有自定义指令
在每个vue组件中,可以在directives节点下声明私有自定义指令
<input type='text' v-color="'red'" />

// 自定义指令
directives:{
	color:{
        // 当指令第一次被绑定到元素时调用
		bind(el,binding){
			el.style.color=binding.value
		},
        // 每次DOM更新时被调用
        update(el,binding){
            el.style.color=binding.value
        }
	}
}

// 当bind和update的逻辑完全相同,可以简写成函数形式
directives:{
	color(el,binding){
        el.style.color=binding.value
        }
	}
}
1
2
3
4
5
6
7
8
9
10
11
12
13
14
15
16
17
18
19
20
21
22
23
2
3
4
5
6
7
8
9
10
11
12
13
14
15
16
17
18
19
20
21
22
23
全局自定义指令
Vue.directive('color',function(el,binding){
	el.style.color=binding.value
})
1
2
3
2
3
# 5. 生命周期
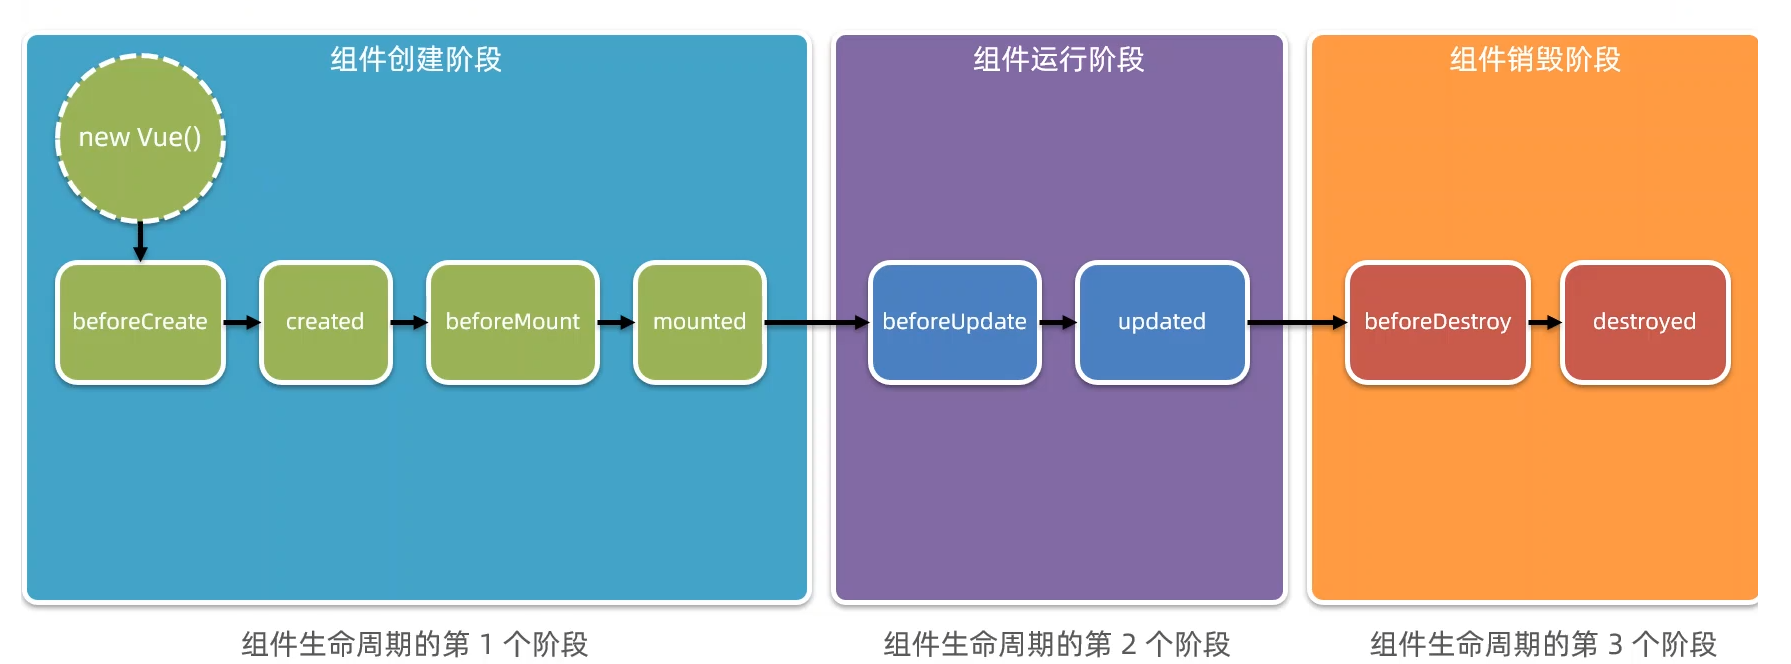
创建期间的生命周期函数
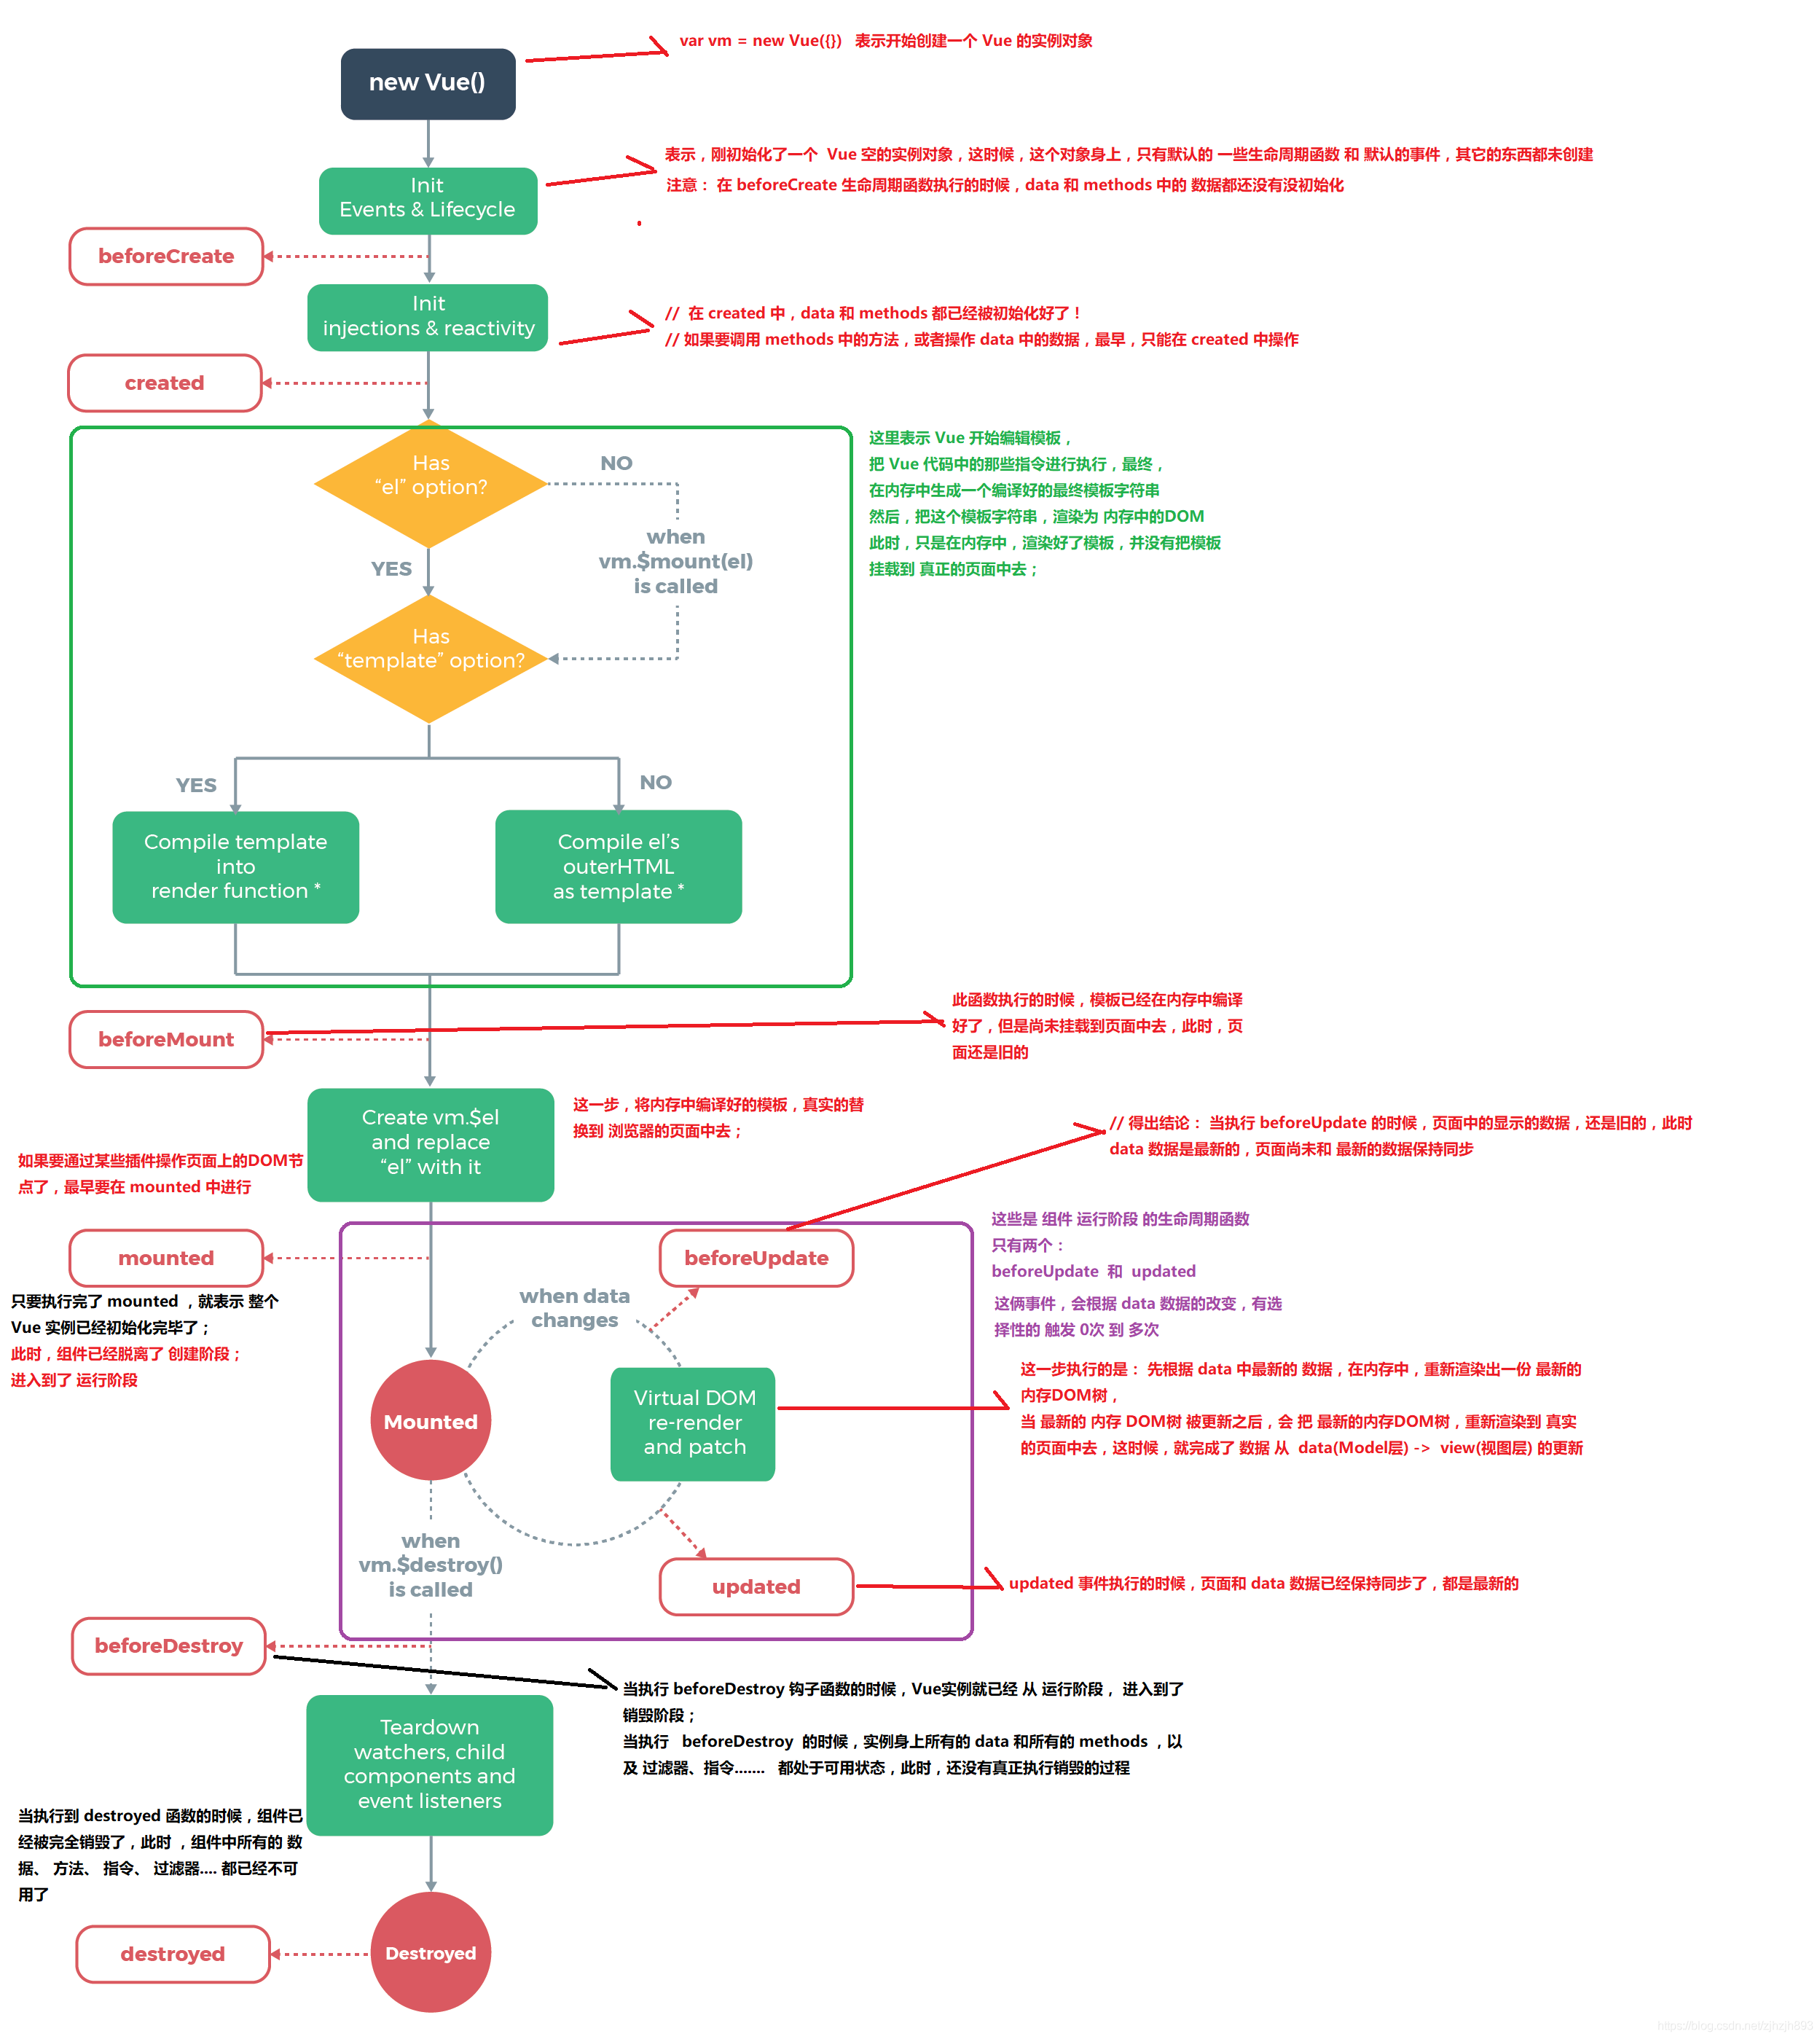
- beforeCreate:实例刚在内存中被创建出来,此时,还没有初始化好 data 和 methods 属性
- created:实例已经在内存中创建OK,此时 data 和 methods 已经创建OK,此时还没有开始 编译模板。我们可以在这里进行Ajax请求。
- beforeMount:此时已经完成了模板的编译,但是还没有挂载到页面中
- mounted:此时,已经将编译好的模板,挂载到了页面指定的容器中显示。(mounted之后,表示真实DOM渲染完了,可以操作DOM了)
运行期间的生命周期函数
- beforeUpdate:状态更新之前执行此函数, 此时 data 中的状态值是最新的,但是界面上显示的 数据还是旧的,因为此时还没有开始重新渲染DOM节点
- updated:实例更新完毕之后调用此函数,此时 data 中的状态值 和 界面上显示的数据,都已经完成了更新,界面已经被重新渲染好了。
PS:数据发生变化时,会触发这两个方法。不过,我们一般用watch来做。
销毁期间的生命周期函数
- beforeDestroy:实例销毁之前调用。在这一步,实例仍然完全可用。
- destroyed:Vue 实例销毁后调用。调用后,Vue 实例指示的所有东西都会解绑定,所有的事件监听器会被移除,所有的子实例也会被销毁。
PS:可以在beforeDestroy里清除定时器、或清除事件绑定。
# 6. Vue组件
模块化和组件化的区别
- 模块化:是从代码逻辑的角度进行划分的;方便代码分层开发,保证每个功能模块的职能单一
- 组件化:是从UI界面的角度进行划分的;前端的组件化,方便UI组件的重用
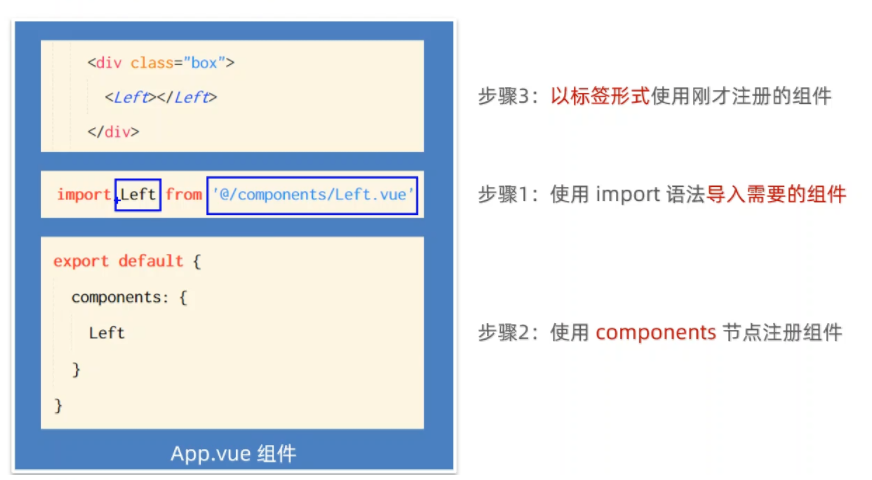
组件的定义和注册
import myAccount from '@/components/myAccount.vue'

// main.js中全局注册
Vue.component('account', myAccount);

// 私有
components:{
    myAccount
}
1
2
3
4
5
6
7
8
9
2
3
4
5
6
7
8
9
组件的切换
- v-if和v-else
<button @click='flag=true'>登录</button>
<button @click='flag=false'>注册</button>

<login v-if='flag'></login>
<reg v-else></reg>

data(){
	return {
		flag=true
	}
}
1
2
3
4
5
6
7
8
9
10
11
2
3
4
5
6
7
8
9
10
11
<component>标签
<button @click="cName='login'">登录</button>
<button @click="cName='reg'">注册</button>

<!-- keep-alive可以保持组件状态,include里为会被缓存的组件 -->
<keep-alive include='reg'>
	<component :is="comName"></component>
</keep-alive>

data(){
	return {
		comName: 'login'
	}
}
1
2
3
4
5
6
7
8
9
10
11
12
13
2
3
4
5
6
7
8
9
10
11
12
13
插槽
插槽Slot是vue为组件的封装者提供的能力,把不确定的、希望由用户指定的部分定义为插槽。
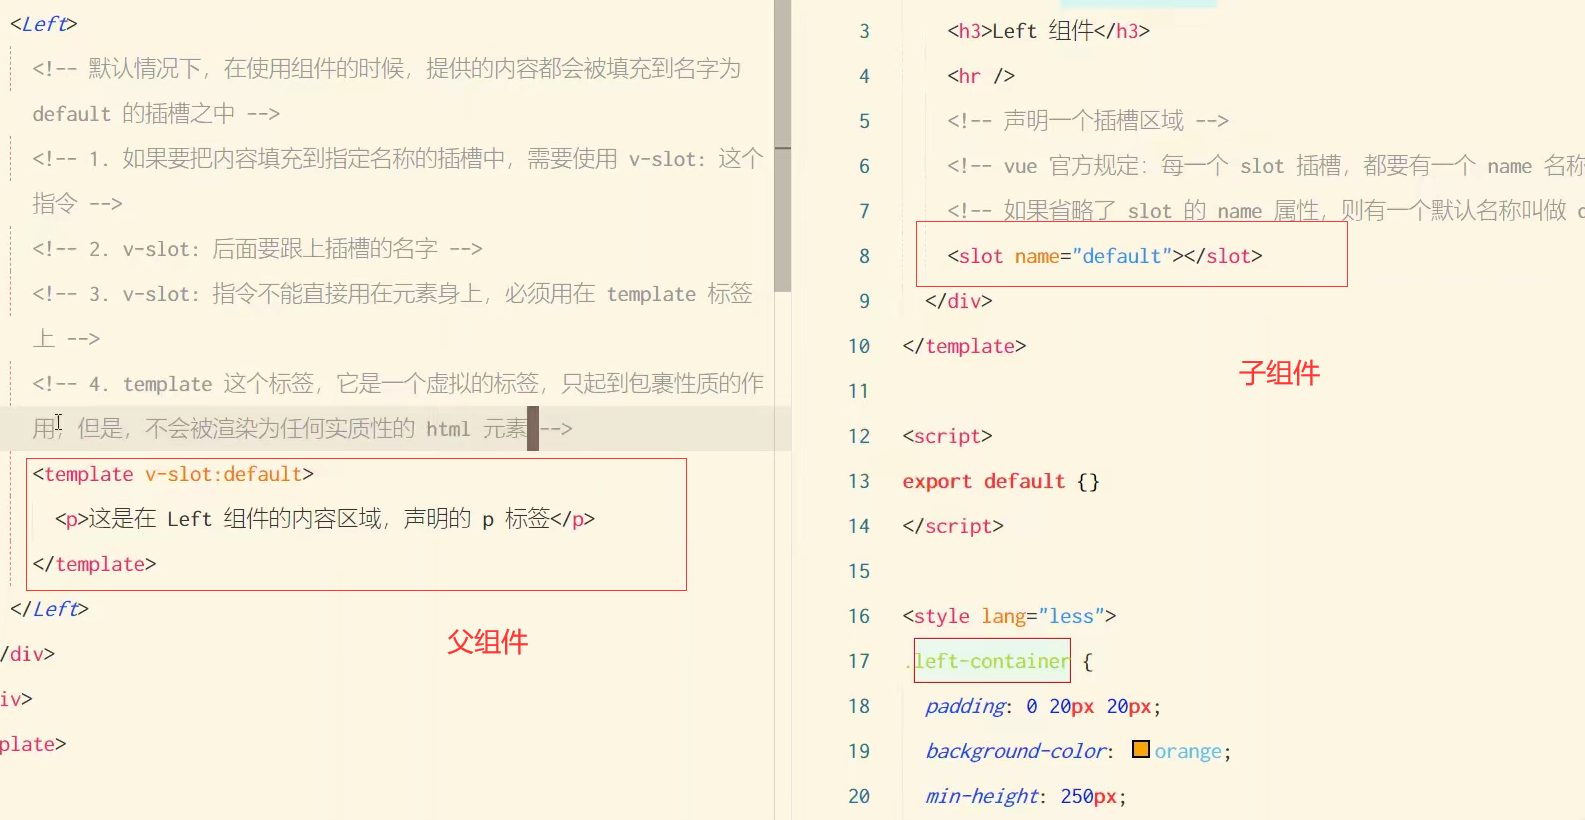
<!-- 父组件 -->
<!-- #top是v-slot='top'的简写 -->
<template #top>
	<p>这是Left组件的内容区域</p>
</template>

<template #mid='val'>
	<p>这是Left组件的内容区域</p>
    <p>{{ val.user.xxx }}</p>
</template>

<!-- 子组件 -->
<slot name='top'>
<!-- 具名插槽 -->
	<h6>这是插槽的默认内容</h6>
<slot>
<!-- 作用域插槽 -->
<slot name='mid' :user='userinfo'>
	<h6>这是插槽的默认内容</h6>
<slot>
1
2
3
4
5
6
7
8
9
10
11
12
13
14
15
16
17
18
19
20
2
3
4
5
6
7
8
9
10
11
12
13
14
15
16
17
18
19
20
# 7. 组件之间的数据共享
父向子传值
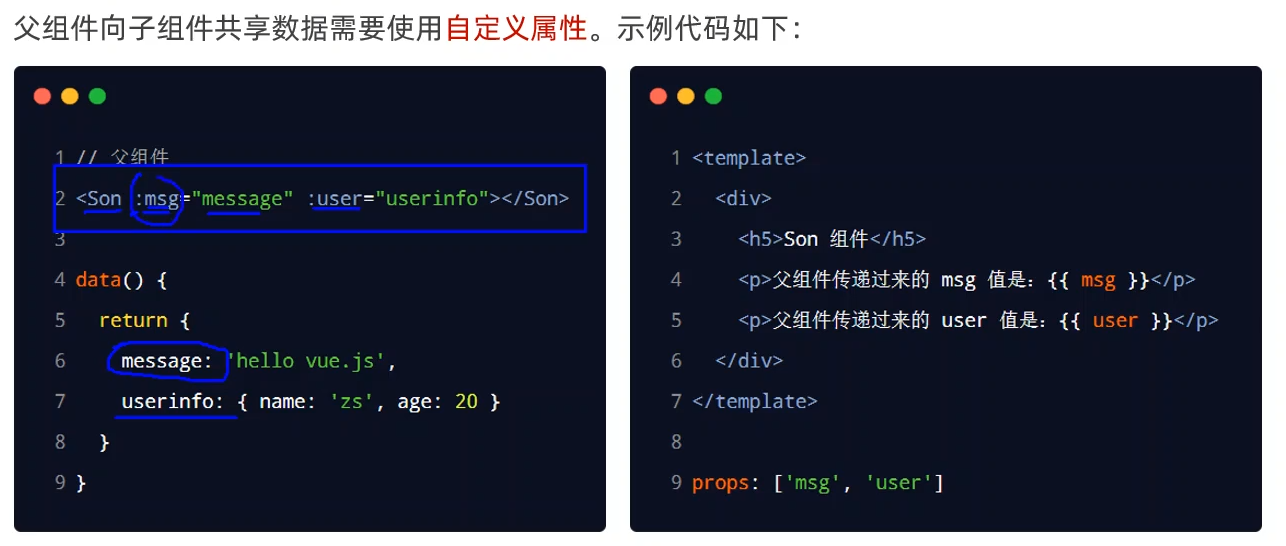
注意:在子组件中的props是接受父组件传值的,且只读,如果要使用该数值,应该存放到子组件的data中。
子向父传值
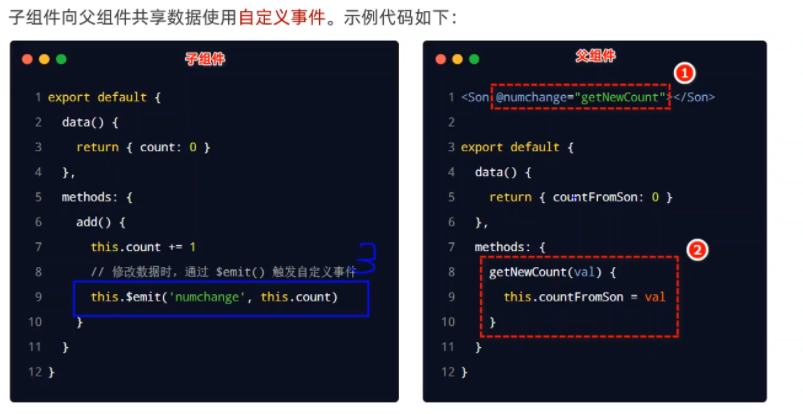
兄弟组件之间的数据共享
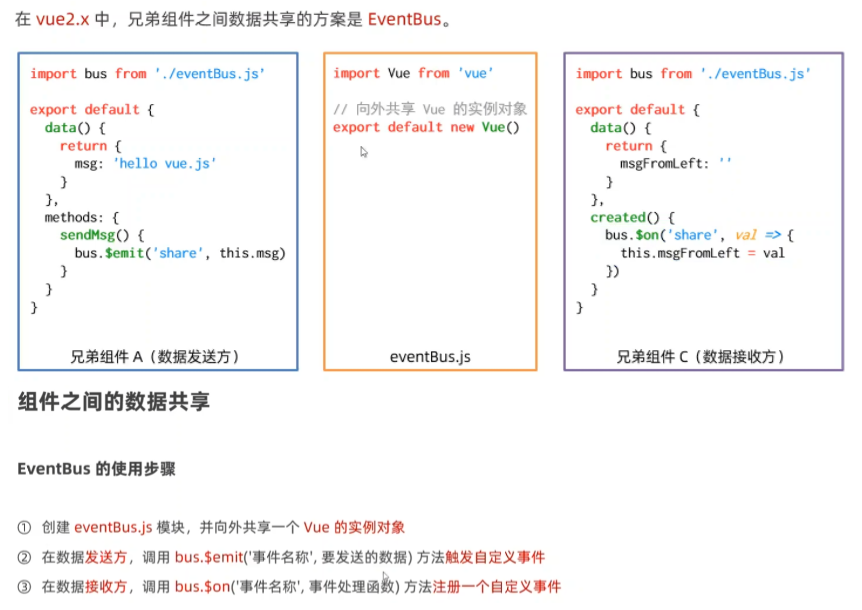
通过ref获取DOM
ref是用来在不依赖原生和JQuery的情况下,获取DOM元素或组件的引用。 每个vue的组件实例上,都包含一个**$refs对象,里面储存着对应的DOM元素或组件**的引用,默认指向一个空对象。
<myComponent ref='myCom'></mycomponent>
<input type="button" value="点击按钮" @click="getRef">

methods:{
	getRef(){
		// 引用组件的实例之后,就可以调用组件上的方法了
		this.$refs.myCom.add()
	}
}
1
2
3
4
5
6
7
8
9
10
2
3
4
5
6
7
8
9
10
# 8. router路由
前端路由:Hash地址与组件之间的对应关系。
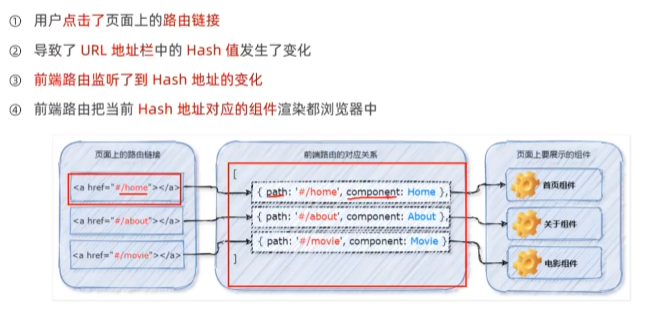
// src/router/index.js 就是当前项目的路由模块
import Vue from 'vue'
import VueRouter from 'vue-router'

// 导入需要的组件
import Home from '@/components/Home.vue'
import Movie from '@/components/Movie.vue'
import About from '@/components/About.vue'

import Tab1 from '@/components/tabs/Tab1.vue'
import Tab2 from '@/components/tabs/Tab2.vue'

import Login from '@/components/Login.vue'
import Main from '@/components/Main.vue'

// 把 VueRouter 安装为 Vue 项目的插件
// Vue.use() 函数的作用,就是来安装插件的
Vue.use(VueRouter)

// 创建路由的实例对象
const router = new VueRouter({
  // routes 是一个数组,作用:定义 “hash 地址” 与 “组件” 之间的对应关系
  routes: [
    // 重定向的路由规则
    { path: '/', redirect: '/home' },
    // 路由规则
    { path: '/home', component: Home },
    // 需求:在 Movie 组件中,希望根据 id 的值,展示对应电影的详情信息
    // 可以为路由规则开启 props 传参,从而方便的拿到动态参数的值
    { path: '/movie/:mid', component: Movie, props: true },
    {
      path: '/about',
      component: About,
      // redirect: '/about/tab1',
      children: [
        // 子路由规则
        // 默认子路由:如果 children 数组中,某个路由规则的 path 值为空字符串,则这条路由规则,叫做“默认子路由”
        { path: '', component: Tab1 },
        { path: 'tab2', component: Tab2 }
      ]
    },
    { path: '/login', component: Login },
    { path: '/main', component: Main }
  ]
})

export default router
1
2
3
4
5
6
7
8
9
10
11
12
13
14
15
16
17
18
19
20
21
22
23
24
25
26
27
28
29
30
31
32
33
34
35
36
37
38
39
40
41
42
43
44
45
46
47
2
3
4
5
6
7
8
9
10
11
12
13
14
15
16
17
18
19
20
21
22
23
24
25
26
27
28
29
30
31
32
33
34
35
36
37
38
39
40
41
42
43
44
45
46
47
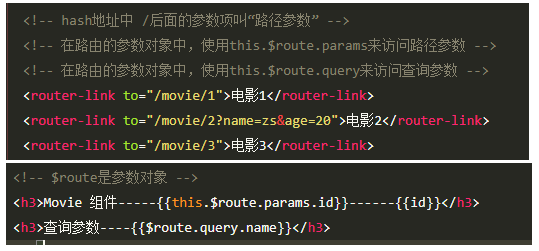
声明式导航&编程式导航
点击链接实现导航的方式,叫做声明式导航
比如点击
<a>、<router-link>调用API方法实现导航的方式,叫做编程式导航、
比如调用location.href跳转到新页面
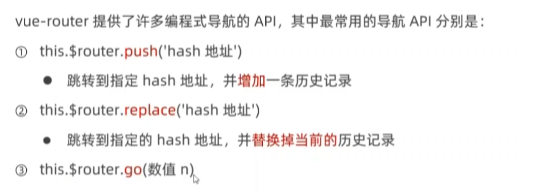
导航守卫
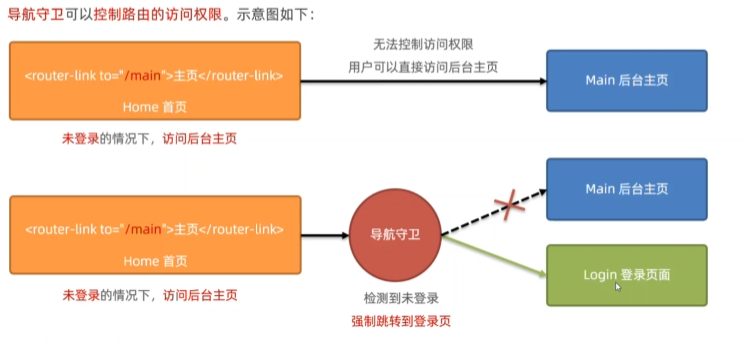
// 为 router 实例对象,声明全局前置导航守卫
// 只要发生了路由的跳转,必然会触发 beforeEach 指定的 function 回调函数
router.beforeEach(function(to, from, next) {
  // to 表示将要访问的路由的信息对象
  // from 表示将要离开的路由的信息对象
  // next() 函数表示放行的意思
  // 分析:
  // 1. 要拿到用户将要访问的 hash 地址
  // 2. 判断 hash 地址是否等于 /main。
  // 	2.1 如果等于 /main,证明需要登录之后,才能访问成功
  // 	2.2 如果不等于 /main,则不需要登录,直接放行  next()
  // 3. 如果访问的地址是 /main。则需要读取 localStorage 中的 token 值
  // 	3.1 如果有 token,则放行
  // 	3.2 如果没有 token,则强制跳转到 /login 登录页
  if (to.path === '/main') {
    // 要访问后台主页,需要判断是否有 token
    const token = localStorage.getItem('token')
    if (token) {
      next()
    } else {
      // 没有登录,强制跳转到登录页
      next('/login')
    }
  } else {
    next()
  }
})
1
2
3
4
5
6
7
8
9
10
11
12
13
14
15
16
17
18
19
20
21
22
23
24
25
26
27
2
3
4
5
6
7
8
9
10
11
12
13
14
15
16
17
18
19
20
21
22
23
24
25
26
27
